Steve`s Country
For a smile as wide as a country sunrise
Easy DIY Christmas Wreath.


Hello everyone! Welcome to something a little different here at Steve’s Country. I showed one DIY that I did last spring, something to just hide some unsightly totes sitting in the corner of my living room. It wasn’t perfect, but it sure looks a lot better. So, today I will show my process in making this Christmas wreath that you see above. It really is very simple and doesn’t cost much to make, one of the best things about this project. And I like homemade, country look projects for any time of the year. So, let’s get started…
At the beginning;
I wanted to use mainly what was at hand, and make this lightweight. So I cut out 2 donut shaped pieces of cardboard, only because I didn’t have any cardboard thick enough to use just one piece. Watch the cat while cutting so no one gets hurt. Muffin always likes to help when I’m making things, that’s her in the corner of the picture. She ran off with one of my smaller pine cones, made a perfect toy is what she thought. Oh well. Then I glued the 2 pieces together and put a piece of wood on top to make sure it stayed flat while the glue dried. Worked perfectly.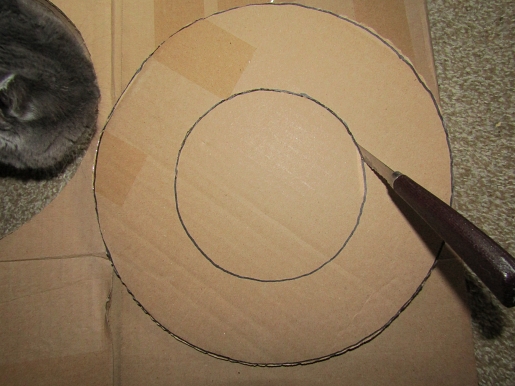

Next, while the glue was drying;
I got my pine cones together and painted some of them white with a fast drying latex paint. Unfortunately because I was unable to go out and get more pine cones I didn’t have enough small cones to use for filling in the smaller spaces. And with thousands of pine cones laying around along my forest path, I certainly didn’t feel like buying any. However, if you have no choice, they are available to purchase at many stores, including our Dollarama. The cinnamon scented ones are actually half the price of the natural.
Then we get the glue gun out;
Along with everything else we want to use and start putting it all together. I use a heavy duty glue gun, not the hobby kind, and a stronger binding glue. I found some nice burlap ribbon with red stripes to wrap around the cardboard, makes it look a lot nicer, especially if there are any gaps since I didn’t have enough of the smaller cones. I just glued it down on the back, then wrapped it around the circle, just putting small dabs of glue in places so it stayed in place properly.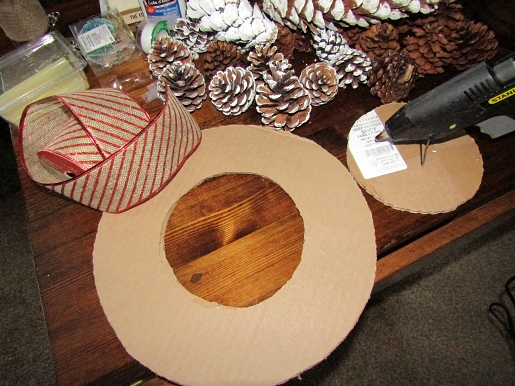

Now we get started with the pine cones;
I’m certainly not a professional at this sort of thing, but really, I don’t want it to look like it came from a store, otherwise I could just buy one. So now comes the addition of some pine cones gluing them, with the glue gun, in place in no particular order, I prefer it that way, but you can put them on in any way you want.
And finally we add the extras;
Which includes some small decorations, like birds and balls, plus a couple mini wreaths. And I added some artificial green spruce branch tips for making it more authentic in its outdoor look with the pine cones. And, that’s it. I added a piece of twine tied on at the top to hang my wreath and there we have the finished product at the top of the page. As for size, mine is about 14 inches (35cm) across.
And to show you another wreath;
Here is the one I made for autumn. I should have done a post for this one too, must admit, I didn’t think of it. Anyway, I hope you enjoyed this, have a wonderful weekend and God bless!
Steve and Muffin.
© 2019 Steve McLeod.

Reblogged this on Guam through my eyes and commented:
Cool project thanks
LikeLiked by 1 person
Thank you very much Bruce for doing this! I hope you have a wonderful day, God bless!
LikeLiked by 1 person
Pingback: Easy DIY Christmas Wreath – Steve’s Country – Guam through my eyes
Excellent. I really like the warm natural colours .
LikeLiked by 1 person
Hey, thank you so much Ally! I hope you have a wonderful Sunday!😃😺☃🎄And I hope those fires are not close by!
LikeLiked by 1 person
Fires are about one hour drive away, the smokey haze is still right here but not as bad as it is was. The dry land, wind and hot days are always a potential hazard. Enjoy your weekend . 🙂🌻🌺🌲🐱
LikeLiked by 1 person
Thanks for the update Ally, hope those fires don’t get any closer to you.
LikeLiked by 1 person
Steve, you and Muffin did a wonderful creative job on both wreaths. They are both unique and beautiful. Would have never known either of them had a cardboard base. 🙂
LikeLiked by 1 person
Thank you so much!! I always like to work with whatever I have around if possible, and cardboard is so easy to work with, and plenty strong for something like this. Have a wonderful evening!😀😺
LikeLiked by 1 person
You are welcome! Enjoy your evening! 🙂
LikeLiked by 1 person
That is so pretty!
LikeLiked by 1 person
Thank you Lydia!😀😀🎄
LikeLiked by 1 person
You’re welcome!
LikeLiked by 1 person
Very pretty, Steve ! Have a restful sleep !
LikeLiked by 1 person
Thanks so much Sharon, I sure hope so!
LikeLike
These wreaths are super cute. Thank you for sharing!
LikeLiked by 1 person
Thanks Hilary! Hope you have a great day!😀😺🎄
LikeLiked by 1 person
Sadly it’s too cold outside to go for a walk and Nick is sick this weekend. And this is the last day of the MCDs promotion, so I won’t get my last sticker for a free drink. ☹️
LikeLiked by 2 people
Guess that means you are getting this same cold weather. Too cold already and it’s getting worse. Glad it’s warm inside though.😁😸☕
LikeLiked by 1 person
It’s very warm in my apartment. It’s quite a shock leaving the apartment and being hit with this cold. 😒
LikeLiked by 2 people
Fortunately it’s a north wind right now, when the wind is west it can get quite cool in here.😬☕
LikeLiked by 1 person
Looks great way to go, Steve. Thanks for sharing. 🙏😊
LikeLiked by 1 person
Thank you for stopping by Yonnie!😃😺⛄🎄
LikeLiked by 1 person
Steve you are certainly welcome! Have a wonderful week! 😊🙏💜
LikeLike
Nice project. Beautiful decor without any expense. I hope Muffin had fun watching it.
LikeLiked by 1 person
Thanks so much Sara! Muffin was around for most of it, mostly she enjoyed playing with the pine cones! Have a wonderful day!😃😺⛄🎄
LikeLike
Beautiful job! There older I get the more I appreciate handmade things. 🎄
LikeLiked by 1 person
Thank you so much! I’m finding the same thing! Hope you have a wonderful day!😃😺⛄🎄
LikeLiked by 1 person
Pingback: Easy DIY Christmas Wreath. — Steve`s Country – Peregrine Arc
Oh my gosh! So beautiful. It looks way better than those being sold in store for high price.
LikeLiked by 1 person
Thank you very much Jessica! I hope you have a wonderful day!😃😺⛄🎄
LikeLiked by 1 person
I wish you the same Steve ❤
LikeLiked by 1 person
Thanks Jessica!!😁😸⛄🎄
LikeLiked by 1 person
I ❤️ this! Homemade—not professional. Exactly! 👍
LikeLiked by 1 person
Thanks Nina!😃😺
LikeLike
😊
LikeLiked by 1 person
Wow, these are beautiful! You are quite talented, Steve! Give Muffin a hug! ☕️☕️🎄
LikeLiked by 1 person
Thank you so much Eugenia!! Muffin is hugged and she is purring her thanks!😻 Have a great afternoon!😀😺 Temp here has dropped to 4F at 1pm and should hit -10F tonight. Starting tomorrow it gets cold for a few days.🥶🙀☕⛄⛄
LikeLiked by 1 person
🧦 🧤 🧣
LikeLike
Reblogged this on BrewNSpew and commented:
Sharing Steve’s DIY Christmas Wreath –
LikeLiked by 1 person
Wow, thanks so much Eugenia!!! Have a wonderful day!!😁😸☕⛄🎄
LikeLiked by 1 person
Awesome DIY. It looks lovely.
LikeLiked by 1 person
Thanks so very much Tiffany!!
LikeLiked by 1 person
Wow Steve 😍 This is awesome. You got so much of skills ✨☺️ With muffins help this piece of artwork has come out really well ✨👌 So pretty✨🤗
LikeLiked by 1 person
Hey Simon! Thanks so much for the encouraging words!😀😀😀😺⛄🎄
LikeLiked by 1 person
✨🥰😍
LikeLiked by 1 person
Hello Steve, this is wonderful, it’s so cute. You made me smile, you fill my heart with joy when you show your skills here, thank you.
I hope you are well, and today, it was awesome to drink coffee together with your words.
Say hello to Muffin😻
LikeLiked by 1 person
Hi Lillian! So nice to see you again! How are you these days? I’m still recovering from my injury, 10 weeks now, and it could be until the end of January before I can walk normally again. So I continue sitting in my chair all day long, Muffin curled up with me.
I’m so glad you enjoyed your coffee with reading this!
Do you have any snow? Muffin meows “hi”. I hope you have a wonderful Monday Lillian!😁😸😻⛄🎄
LikeLiked by 1 person
Hi Steve, lovely to hear from you, and I’m sorry you still recovering. You are in my thoughts.
I am not well, I don’t know how long it will take… and I don’t know what it is… so.. I write and do my art things when I can…
We have snow… not so much, but enough🙈and it is realy cold…
Take care Steve🌹
LikeLiked by 1 person
I’m very sorry to hear you’re not well Lillian, praying for you.
Long recovery time, too much sitting, but I’m getting there slowly anyway.
That’s good, keep writing and doing your art, that’s always a good thing when not feeling well. It can be good therapy. That’s what I try to do as well.🙂
Hope you have a good day Lillian!😁😸⛄🎄
LikeLiked by 1 person
Thank you so much Steve for your heart felting comment😺take care.
LikeLiked by 1 person
😁😸😻
LikeLiked by 1 person